
Software features
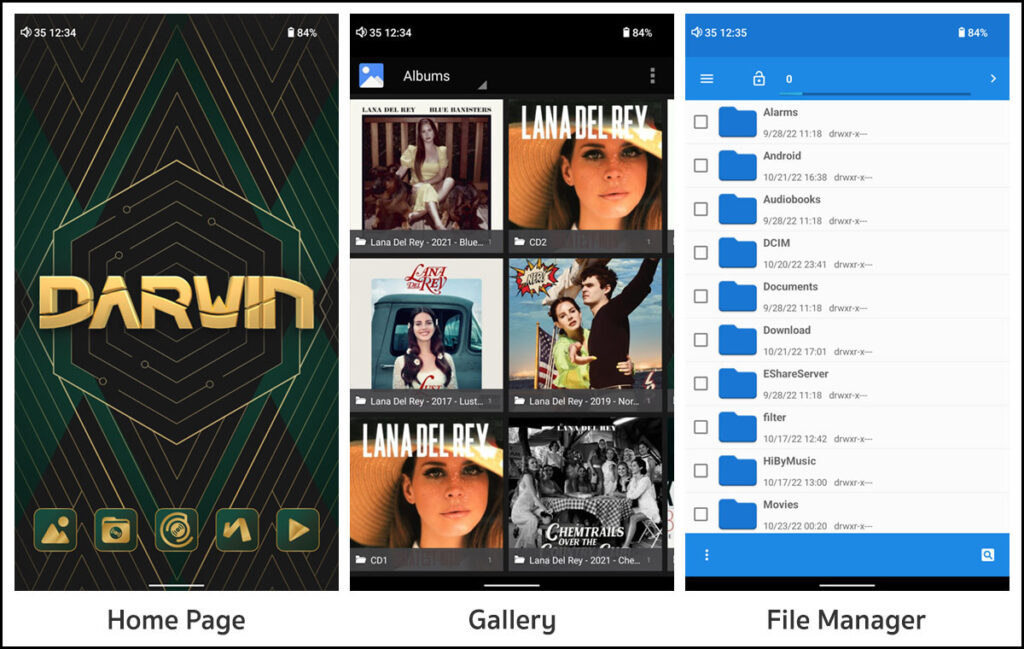
The jump to Android 12 was a welcome surprise, and the UI and software functionality on RS8 is definitely the best yet for a HiBy DAP. If you’ve seen or used RS6, you’ll recognise the familiar HIBy boot-up logo and green-and-gold-themed Darwin landing screen. The main interface features a Darwin-logo wallpaper and five Darwin-style icons (from left-to-right): Gallery, File Manager, HiBy Music, Via (Chinese web browser), and Google Play Store.
Android 12 uses navigation gestures by default, so swipe left and right takes you back and forward respectively, swipe left from the top of the screen displays a row of recently used apps, and swipe up reveals all the currently installed apps (note: you can enable the old three-way navigation controls in Settings if you don’t like the new gesture controls).
A one-finger swipe down from the top of the screen reveals a drop-down menu with quick-launch tabs, such as Internet, Bluetooth, Audio Settings and Darwin Control, among others. You can add or remove tabs by clicking the small pencil icon, leftmost in a row of three icons below the main tabs. There’s also a handy power-off icon along with an icon to launch the main Android settings menu.
Below the tabs is a notification window, where you’ll see various notifications from installed apps and services. As with any Android device, you can customise the notifications that appear here (and on the lock screen) from the settings menu, or disable notifications altogether.
HiBy has added some other useful gesture navigation tricks, for example a three-finger swipe down from the top of the screen captures an instant screenshot. And you can add many more gesture actions when you start customising RS8 for yourself (see the Customising RS8 section below).

Settings
You’ll find all the configuration options you need for fine-tuning RS8 in the main Settings section. Everything from Audio Settings to Security, Privacy and System Updates is here. I won’t cover all the Settings options, but I’ll go through some of the important ones you’ll want to tweak when you’re setting up the DAP for the first time.
Audio Settings
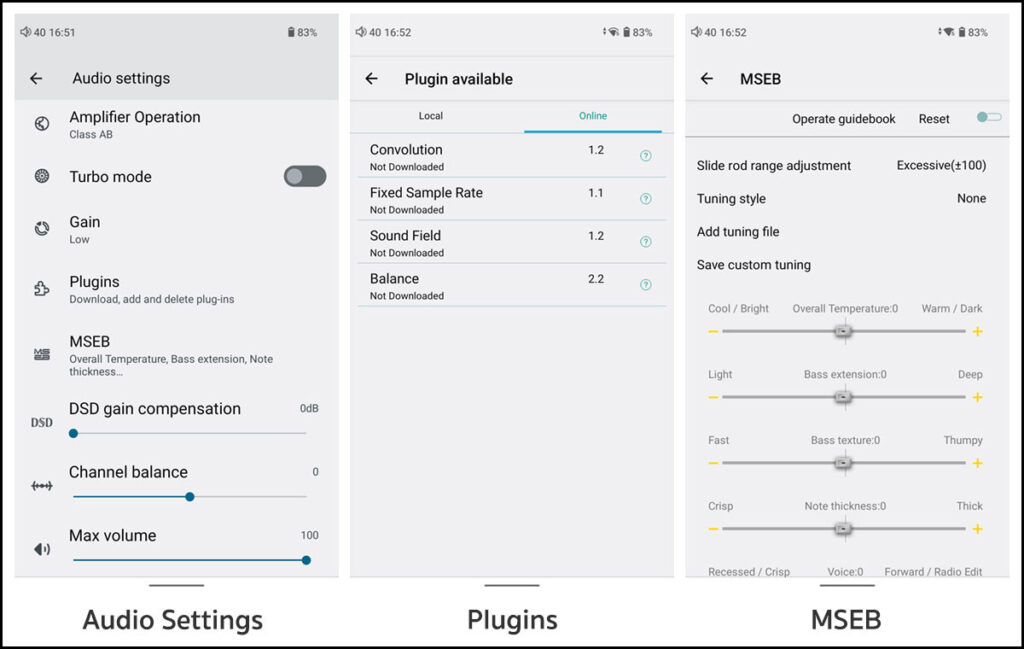
This is where you set all the direct amplification controls, including switching between Class A and AB modes, enabling Turbo mode, changing Gain levels, adjusting DSD gain compensation, setting channel balance and capping maximum volume. You can also switch the direction of the volume wheel from this menu, from clockwise to anti-clockwise, depending on your preference.
There are two other important menu elements in Audio Settings: MSEB and Plugins. The former is HiBy’s system-wide EQ that lets you tweak the sound using natural language audio terminology like ‘overall temperature’, ‘note weight’ and ‘sibilance’ rather than having to guess which FR band does what. I’ve long been a fan of MSEB, and prefer to use it over other EQ systems. I find it works well, without notably degrading SQ, and it lets me quickly dial in the very minor adjustments I sometimes need to make with certain IEMs.
Plugins is a recent addition that lets you download system-wide DSP plugins that affect sound output in different ways. At the time of writing there are four downloadable plugins:
- Convolution – uses an input convolution file to create numerous effects, from headphone or speaker impulse and frequency response correction, to headphone crossfeed, speaker crosstalk cancellation, and room simulation for headphones.
- Fixed Sample Rate – fixes the sample rate of whatever you’re playing.
- Sound Field – expands or contracts the stereo sound field, from 0 (mono) to 2 (super stereo).
- Balance – adjusts the left and right channel balance in the digital domain, so applies the channel balance changes to both LO and PO.
Both MSEB and Plugins effects are available to any music app installed, including streaming services, but won’t work with Tidal MQA files that need to remain bitperfect for playback.
Darwin Controller
These settings let you control various aspects of the R2R playback system, including switching between NOS (non-oversampling) and OS (oversampling), setting predefined low-pass antialiasing and DSD filters, and tweaking Atmosphere Enhanced and Harmonic Controller effects.
To be perfectly honest I can’t hear any significant differences between the various filter settings, even though they’re neatly illustrated in an attempt to show what each filter does to the signal. But don’t take my word for it, try for yourself. Same goes for the Atmosphere Enhanced toggle and Harmonic Controller slider.
Finally, there’s a selection of built-in filter presets for various IEMs, with a bunch of popular IEMs added in the latest firmware update. Again, I haven’t had much luck with getting these to sound very different, so just leave the presets disabled and toggle Harmonic Controller instead.
Helpful hint: The one toggle I would recommend switching on is NOS mode. For a discrete R2R DAC, I generally enable NOS as I find it sounds more natural. For a slightly ‘cleaner’ response, you can disable NOS, which automatically enables 16x oversampling.

Other settings
Default USB configuration (Settings – USB). If you want to use RS8 as a USB DAC, this is where you go. The setting defaults to ‘No data transfer’, so select from one of the two Audio-in options to enable DAC mode. Be careful if you set this mode to Audio-in (no USB power), as the next time you connect the charging cable, it may not actually charge the battery despite indicating that it is. If that’s the case, go back to this menu and change USB mode to another option.
Speaking of USB DAC mode, I tested this by pairing RS8 to my MacBook Pro, using Audirvana, my preferred Mac player. RS8 was detected straight away on the Mac, with the USB input screen displayed on the RS8 screen. Interestingly, Audirvana only detects support for bitrates up to 768KHz and DSD256, although the DSD limit is a known Mac limitation.
Playback quality using USB DAC mode is indistinguishable from playing back the same tracks directly from RS8. Moreover, RS8 can output to Bluetooth devices while connected as a USB DAC, which means you can still use wireless headsets or output music to wireless speakers while RS8 is receiving input from another digital source.
Bluetooth Audio Input (Settings – Bluetooth). RS8 supports Bluetooth sending and receiving, with all the built-in codecs available for both. This means you can stream music from your smart devices (or another DAP) via Bluetooth, with RS8 as the DAC and amp. While quality does take a small hit, even in LDAC receive mode, it should still sound better than playing back music directly from your phone, considering RS8’s beefy audio hardware.
Helpful hint: One advantage of using RS8 as a Bluetooth transmitter is the ability to install custom apps for wireless hardware. Since RS8 is essentially an Android smart device, I can, for example, use the Sony Headphones Connect app from Google Play Store to directly control the various features on my Sony XM4 earphones, including noise cancelling modes and custom sound profiles. This is an important feature that’s not available to non-Android DAPs, even those with wireless support, and even some Android DAPs that only allow certain apps to be installed.

App Icon Style (Settings – Display). If you’re not going to fully customise your RS8 but want to switch from the default ‘Darwin-style’ icons, this is where to go. You can also toggle between Dark Mode (default) and Light Mode from this menu.
Battery (Settings – Battery). It’s a good idea to set a charge limit to improve battery health, since lithium batteries don’t fancy being left on full charge for long. I set my RS8 to maximum charge to 90%, and suggest you do the same. Just be aware that this setting only works if you charge the RS8 while it’s on, since switching it off while charging bypasses the software battery charge setting.
Date & time (Settings – System). I don’t know about you but I find it useful to know the current time when I’m listening to music, and this is where you go to set it. RS8 is also able to keep track of the date and time zone, and update both time and date automatically (when connected to the Internet). Your exact time zone might not show up when you set up the DAP during the initial startup, but if you search available time zones, you’ll find many more options listed here.
System updates (Settings – System). This is where you download and install new firmware. By default, RS8 will notify you automatically when new firmware is available, as long as you’re connected to the Internet. You can change that setting here, and get more info on pending firmware updates before downloading them.
Helpful hint: if you get a server error trying to install new firmware, select Clean up the cache from the three-dot menu option at the top right of the screen and try again.

HiBy Music
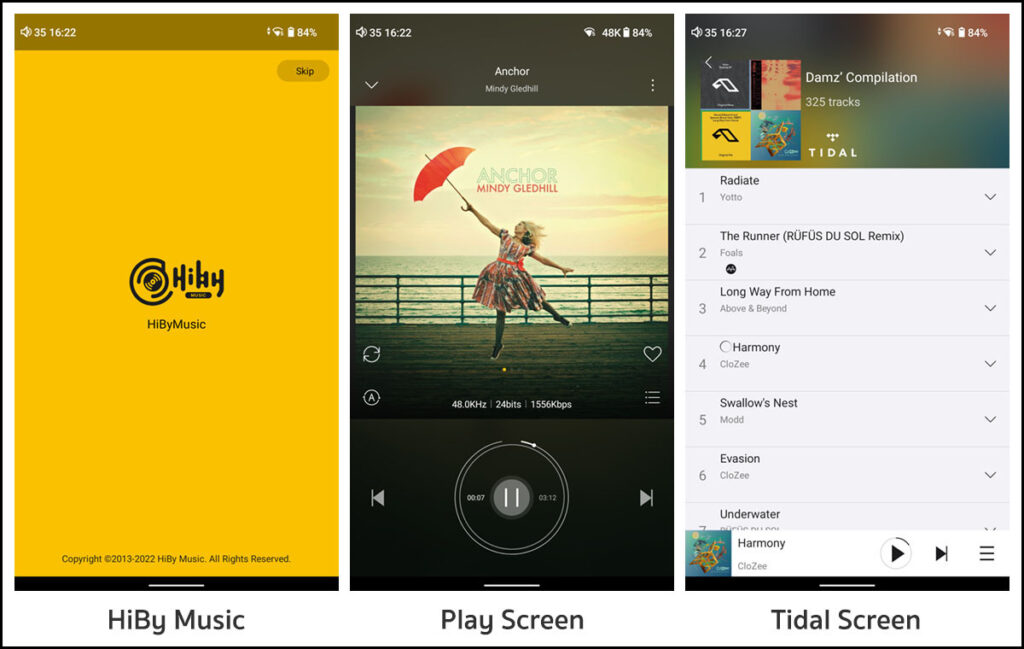
RS8 comes preloaded with HiBy Music Pro, the most up-to-date version of the company’s music playback app. While I don’t use it myself, it’s a very complete piece of software, at least in terms of features and functionality.
As you can see in the screens below, if you’re familiar with other modern music players you should find HiBy Music very intuitive and easy to use, with all the playback options you’d expect from a mature music player.
Some of the more advanced functions you’ll find here include WiFi copy to RS8 from your networked computer or smart device, and a remote control for the app from your phone using HibyLink. HiBy Music also features cloud-based playback (including playback from networked DLNA servers), and includes full Tidal integration, though you still need to use the official Tidal app to download and play offline files.
Since HiBy Music is the primary music playback app and comes preloaded on the RS8, it’s also the only app guaranteed to work with all the file types Darwin II supports, including ultra-high-res PCM and DSD files. While most third-party apps should be able to do the same, they don’t always bypass Android’s default SRC (Sample Rate Conversion), whereas HiBy Music always does.
Aside from HiBy Music, there’s not much else that comes preloaded that’s of much value, to be honest, other than some basic Android apps like Clock, Calculator and Gallery. Thankfully, with built-in Google Play support (international version only), you can install almost any current Android application, which opens the door to a world of customisation options that can turn RS8 into a far more powerful and functional device than it already is out the box.
Continue to customising RS8…


One Response
Redefines the term “fully comprehensive” when it comes to gear reviews!
Quite outstanding (again) in every respect.